The content of the article:
- The main symptoms of starter problems
- Removing the starter from under the hood
- Diagnostics after dismantling
- Assembling the starter and checking its performance
At the first signs of damage to the starter, measures should be taken to diagnose it and, if necessary, repair it. This can be done in a car service, and, most often, with your own hands - eliminating a starter breakdown is an operation of medium complexity, which is within the power of an ordinary driver, if we are not talking about a complete disassembly of the device. Most likely, you will need to replace its part and / or sand the component parts with sandpaper.
In order to save money on the services of a car repair shop, you will need an inspection pit, a set of tools and a charged battery. Below we will consider the most common problems of starters, the components of the mechanism and the possible connection of each of them with a breakdown.
The main symptoms of starter problems

Repair and diagnostics of the device may be required not only when the car does not start at all - malfunctions arising in the operation of the starter can be identified at an early stage. The first signs of the need for an early repair include cases when the starter:
- does not scroll from the first turn of the key. This may mean that the problem lies in the brushes that transmit voltage to the starter rotor - they need to be replaced.
- with a fully charged battery, it starts to work with a delay or spins up significantly longer. This also indicates damage and wear to the brushes or bearings, due to which the rotor, the moving part of the mechanism, catches the winding - the stator.
- with a delay, it returns its component parts to their original position after starting the engine - this suggests damage / wear to the engine flywheel or bendix gear - the starter part that spins the flywheel. An indication of its breakdown may also be a situation in which the bendix clings to the flywheel, but cannot spin it.
- continues to rotate with the engine. That is, after the car engine has been unwound, the starter parts are not disengaged from it with the help of a return spring, but rotate at the same speed as the engine flywheel. Most likely, the fault lies with the clogged rotor and / or power contacts of the relay.
There can be many scenarios of starter breakdowns, and if one of them was implemented in your car, you need to immediately start repairing.
Removing the starter from under the hood

Before removing the starter
An inspection hole is needed to pull the starter out from under the hood, and then diagnose it outside the car. Anyone who does this for the first time will spend a relatively long time, therefore, before starting dismantling, you can try to clean the starter contacts, which could have time to oxidize during operation, make sure they are securely fastened, it is also possible to replace the power wires.
You need to check the entire electrical circuit, so you should make sure in advance that the problem does not lie with the battery. If these simple measures do not correct the problem, the device must be removed.
If you do not know where the starter motor is located in your car, you can be guided by the sound under the hood that appears when you turn the key - this will require the help of a second person who will sit in the car.
Extraction process
First of all, it is necessary to disconnect the device from the battery - remove the terminals and conductive cables from the solenoid relay. After that, the fastening bolts are unscrewed, as a rule there are 2 or 3 of them - for this you will need a hinged extension.
It has already been mentioned above that this work requires an inspection pit, since sometimes, to dismantle the starter, it will be necessary to remove the units and mechanisms that are on the way to it, in most cases - the sheathing of the engine compartment protection.
Diagnostics of the starter after dismantling

First, let's briefly talk about the main components of the starter, which is useful to know, even if you do not plan to do it yourself:
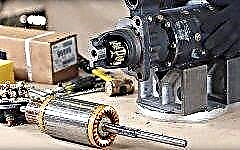
- Anchor - axial part, the rotor of the electric motor, the torque of which is transmitted to the crankshaft of the engine. That is, the starter converts the electrical energy of the battery into mechanical energy.
- Stator (winding) Is a stationary part of the mechanism interacting with the rotor. If the starter is geared, then it contains permanent magnets, which complicate the repair of this part.
- Bendix - a small clutch that drives the engine flywheel. When the latter starts to spin faster, the return spring moves the bendix to the standard position to prevent the transfer of engine torque back to the starter.
- Pull-in (or traction) relay... The part is cylindrical in shape and half the size of the starter, located in its upper part. Synchronizes the operation of the entire mechanism - when the ignition key is turned, it pushes the bendix forward from the body, setting in motion the car engine mechanism.
- Brushes and brush holders - are located at the rear cover of the starter, supply operating voltage to the rotor plates and increase the efficiency of the electric motor during its operation. When the key is returned to its original position in the ignition lock, the voltage is lost.
To identify the module in which a breakdown has occurred, it is necessary to clean it, process the oxidized contacts with sandpaper and connect the battery - connect the terminals and touch the starter case with the free end of the negative wire.
A loud click and a bendix moving forward will be evidence of the serviceability of the retractor relay. If this does not happen, it is necessary to replace the relay with a new one.
If the problem lies not in the relay, you should also check the stator insulation with an ohmmeter, the damaged winding is restored with an impregnating varnish, but if you have no experience with electrical measuring instruments, it is best to entrust this operation to a specialist. If the starter is geared, then permanent magnets will be present in its design, and if they are damaged, it is extremely difficult to repair them, so it is best to buy a new starter.
The rotor insulation should also be checked if the other parts of the starter are working properly, but for this you need to unscrew the studs holding the two halves of the electric motor and disassemble it completely. If traces of burning and soot are visible on the anchor, it should be replaced. There should be no strong plaque on the collector - if there is one, you need to clean the part with sandpaper. It is important to inspect all parts for damage and contamination - the coupling should rotate freely in one direction and lock in the other.
It is also advisable to replace the brushes, regardless of whether they are the cause of the device breakdown or not. - it took you some time to extract it, so it makes sense to carry out preventive measures to delay the moment of repeated work under the car. The brushes are attached using terminals and springs that press them from above; to replace them, you need to remove the starter cover from the side of the ignition switch with a screwdriver.
Even if at some stage of the check after parsing the starter the problem was identified and eliminated, one should not neglect the time spent on removing and parsing - it is reasonable to take the opportunity to carry out a full diagnosis and cleaning of all its mechanisms to reduce the likelihood of problems with the device in the future.
Remember that its breakdown on the road will most likely mean a call for a tow truck, so it's best to spend time on it in a garage.
Assembling the starter and checking its performance

It is very important to remember the sequence with which you disassembled the device - it is advisable to arrange its parts in the same order so as not to get confused during assembly.
Repeat everything in reverse order, and then connect to the battery for testing. A plus must be connected to the rotor winding, and a minus to the housing, then a short circuit will occur in the relay contacts, the bendix must move freely. The electric motor should function evenly and without unnecessary noise when a plus is applied to it.
After these checks, the starter can be installed back on the vehicle. Of course, the mechanism of the mechanism can differ greatly on different models of cars, therefore, before starting the repair, you should familiarize yourself with the technical documentation and, at least, look at the diagram of the starter device in your car.
Do-it-yourself or car service specialists need to carry out preventive maintenance work from time to time even if there are no signs of malfunctions, since this device has a certain margin of service life, usually measured at 100-150 thousand km.